Blog

  • 5 Coastal Grandma Knitting & Crochet Patterns

    5 Coastal Grandma Knitting & Crochet Patterns

    'Coastal Grandma' is the big thing everywhere right now! According to Glamour, the Coastal Grandma aesthetic is “the crisp, monied, perennially summertime lifestyle of a beautiful older woman in a Nancy Meyers movie or an Eileen Fisher photo shoot.” So think lightweight fabrics, pastel and neutral colours, and somewhat modest clothing.

    Sounds appealing to you? If so, read on because we here at Crafty Llama have found five knitting/crocheting patterns that fit right into the Coastal Grandma aesthetic/trend!


    1. The first pattern is by @Drops Design and it is a crochet bucket hat. The ‘Elven Queen Hat’ serves a fusion of trendy (bucket hat) and aesthetics (crochet beachy granny style).


    What you’ll need:

    2. This next pattern, also by @Drops Design is the ‘Slice of Summer’ crocheted shawl. I don’t know about you, but nothing screams coastal like a lightweight shawl! You can wear it as a bikini cover, scarf, or a wrap - the uses are endless!


    What you’ll need:

    3. What Coastal Grandma doesn’t have a lightweight beachy jumper?? This ‘Wild and Free’ jumper/sweater knitting pattern by @Drops Design features a laced-edge v-neckline.


    What you’ll need:

    4. This next pattern is called the ‘Camel Bucket Bag’ by @mamainastitch and it screams summer beachy-time fun!

    Crocheted with some chunky yarn, this bag finishes off with a pair of bamboo handles that really give you the early 2000s vibe.


    What you’ll need:

    5. Lastly, we’ve got another bag pattern by @mamainastitch (just in case the previous one wasn’t grandma-y enough). This bag is cross-body and knit in a herringbone stitch.


    What you’ll need:


    Credit to @Drops Design and @mamainastitch for their patterns and photos. Check them out for more knitting and crocheting patterns.

    If you make any of these (or any Coastal Grandma designs in general!), tag us on Instagram @CraftyllamaUK for a chance to be featured on our page!

    Have fun and happy knitting!

    Continue reading
  • Happy Star Wars Day: 5 Free Star Wars Amigurumi Patterns

    Happy Star Wars Day: 5 Free Star Wars Amigurumi Patterns

    As every sci-fi fan out there knows, May 4th is celebrated around the world as Star Wars Day! In celebration of the day, we’ve collected together some of the best Star Wars amigurumi patterns to help you bring your favourite characters to life!


    First up we’ve got the one, the only: Han Solo! This adorable little amigurumi pattern by @Ankita Palit is made with five different coloured yarns so it’s very detailed. You’ll need to know the basics of crochet such as magic rings, increase, and decrease.

    Here are the supplies you’ll need:


    This next pattern by @Ankita Palit is of Princess Leia and she dons her signature white hood and space buns! If you’re making Han Solo, you’ve got to make Princess Leia as well! This pattern is very similar to the previous pattern in terms of the crochet techniques required, so all you need in addition is white yarn!


    Here are the supplies you’ll need:

    Arguably the most iconic character from the entire franchise, Darth Vader is a must for your Star Wars amigurumi collection. This pattern by @Ankita Palit is similar to the previous two and he even comes with a little red lightsaber.

    Here are the supplies you’ll need:

    4. BB8

    This next character is too adorable not to make! This BB8 pattern by @TheKnitGuru is made with DPNs (double pointed needles) so will require a bit more skill since you will be knitting with 5 needles!

    Here are the supplies you’ll need:

    Last, but not least, we’ve got the cutest little character you’ll ever see! This amigurumi Baby Yoda pattern by @Milagros Sierra is so sweet you’ll want to make it into a keychain, lanyard, stuffed toy, and more!.

    Here are the supplies you’ll need:

    Thanks to @Ankita Palit , @TheKnitGuru and @Milagros Sierra for letting us share their patterns and photos. For more Star Wars amigurumi visit @Ankita Palit and check out @TheKnitGuru & @Milagros Sierra for more adorable amigurumi patterns!

    Make sure to tag us @craftyllamauk on Instagram in any photos you post if you bring any of these Star Wars amigurumi patterns to life. We love to see what amazing creations you make.

    Have fun and “May the Fourth be with you” this Star Wars Day!

    Continue reading
  • Crochet your own Crafty Llama!

    Crochet your own Crafty Llama!

    As you’ve noticed, our name is Crafty Llama, so naturally we’ve come up with a free crochet amigurumi llama pattern for you to make at home! This is a beginner-friendly crochet pattern but you will need to know the basics of chain stitching, creating a magic circle, increasing and decreasing stitches, and making single crochets.


    Tips:

    • Make sure to keep a tight tension when you’re crocheting so there are no holes that your stuffing can come out of.

    • Stuff your amigurumi llama with a lot of filling! You want it to look plump and hold its shape so fill it with a good amount of filling.

    • Put your stitch marker on the last stitch of every row to keep track of how many you’ve done. This can be a bit difficult at times, especially while trying to follow the pattern at the same time, so consider getting a row counter to make life easier.

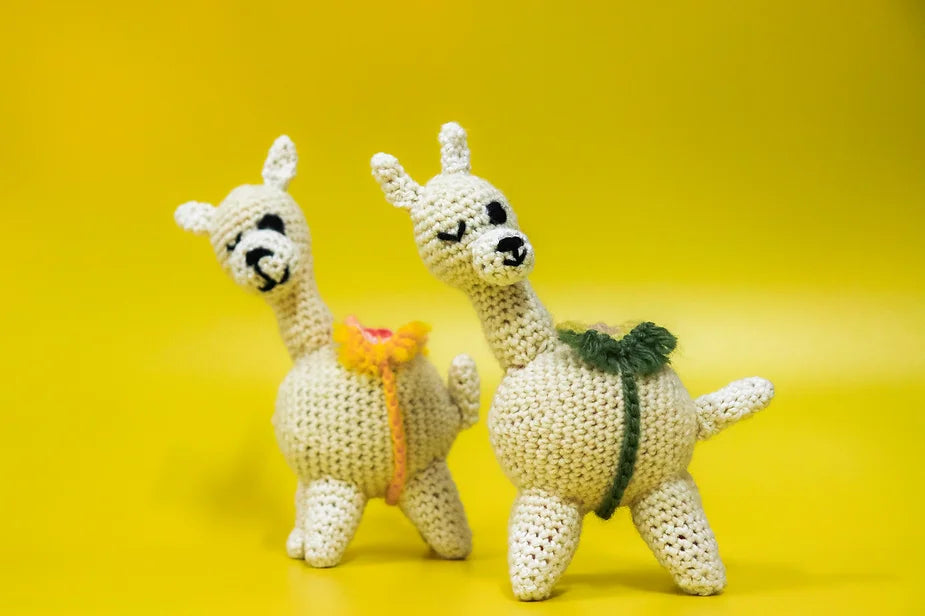
    Here are the two amigurumi llamas we made using this pattern: Meet Levi and Andi!

    Here are the supplies we used:


    Crafty Llama Crochet Pattern


    Crocheting your llama's legs: (make 4)

    With white yarn

    ROUND 1: Create a magic circle with 6 SC (6)

    ROUND 2: 1 SC in each st around (6)


    ROUND 3: SC in first st, SC INC in next, repeat around (9)

    ROUND 4: 1 SC in each st around (9)

    ROUND 5: SC in first 2 st, SC INC in next, repeat around (12)

    ROUND 6: 1 SC in each st around (12)


    ROUND 7: SC in first 3 st, SC INC in next, repeat around (15)


    Change to cream yarn.

    ROUND 8-11: 1 SC in each st around (15)

    End with slst. Cut yarn, leaving enough to use to sew onto the body later. Tuck other ends into the leg.


    Do this three more times to make four legs for your llama. Stuff the legs and put them aside for now.

    Crocheting your llama's body:

    With cream yarn

    ROUND 1: Create a magic circle with 6 SC (6)

    ROUND 2: SC INC in each st around (12)

    ROUND 3: SC in first st, SC INC in next, repeat around (18)


    ROUND 4: SC in first 2 st, SC INC in next, repeat around (24)

    ROUND 5: SC in first 3, SC INC in next, repeat around (30)

    crochet amigurumi llamas

    ROUND 6: SC in first 4, SC INC in next, repeat around (36)

    ROUND 7: SC in first 5, SC INC in next, repeat around (42)

    ROUND 8-17: SC in each around (42)


    *Make sure to use a stitch marker to know when you’ve finished a round!*


    ROUND 18: SC in first 5 st, INV DEC in next, repeat around (36)


    ROUND 19: SC in first 4 st, INV DEC in the next, repeat around (30)

    crochet amigurumi llamas

    ROUND 20: SC in first 3 st, INV DEC in the next, repeat around (24)

    ROUND 21: SC in first 2 st, INV DEC in next, repeat around (18)

    ROUND 20: SC in first st, INV DEC in next, repeat around (12)


    Stuff with filling and continue to fill as you go.


    Decrease in each st around until you can’t and slst to close the remaining hole. Cut yarn and weave in end.


    Crocheting your llama's tail:

    With cream yarn

    crochet amigurumi llamas

    ROUND 1: Create a magic circle with 6 SC (6)


    ROUND 2: 1 SC in each st around (6)

    ROUND 3: SC in first 2 st, SC INC in next, repeat around (8)


    ROUND 4-7: 1 SC in each st around (8)


    End with slst and cut the yarn leaving a long tail for attaching to body.


    Crocheting your llama's neck and head:

    With cream yarn

    crochet amigurumi llamas

    ROW 1: Make a chain with 13 st, connect to the first chain with 1 SC so you have a circle (14)

    ROW 2 - 5: 1 SC in each st around (14)


    ROW 6: SC in first 5 st, INV DEC in next, repeat around (12)

    ROW 7-12: 1 SC in each st around (12)

    START OF HEAD

    crochet amigurumi llamas

    ROW 13: SC in first st, SC INC in next, repeat around (18)

    ROW 14: SC in first 2 st, SC INC in next, repeat around (24)


    ROW 15: SC in first 3 st, SC INC in next, repeat around (30)

    ROW 16 - 18: SC in each st around (30)

    ROW 19: SC in first 3 st, INV DEC in next, repeat around (24)


    ROW 20: SC in each st around (24)


    Attach safety eyes if using, if not continue without and sew eyes on at end.

    ROW 21: SC in first 2 st, INV DEC in next, repeat around (18)

    ROW 22: SC in first st, INV DEC in next, repeat around (12)


    ROW 23: INV DEC in each st (6)

    Decrease in each st around until you can’t and slst to close the remaining hole. Cut yarn and weave in end.

    Crocheting your llama's snout:

    With white yarn

    crochet amigurumi llamas
     

    ROUND 1: Create a magic circle with 6 SC (6)

    ROUND 2: SC in each st around (6)

    ROUND 3: SC INC in each st around (12)


    ROUND 4: SC in each st around (12)

    Round 5: SC in first 2, INV DEC in next, repeat around (9)


    End with slst.

    Sew snout onto head and sew nose, mouth and eyes now if not using safety eyes.


    Crocheting your llama's ears: (make 2)

    With white yarn

    ROUND 1: Create a magic circle with 4 SC (4)

    ROUND 2: 1 SC in each st around (4)

    ROUND 3: SC in first st, SC INC in next, repeat around (6)

    ROUND 4: SC in first 2 st, SC INC in next, repeat around (8)


    ROUND 5: 1 SC in each st around (8)


    End with slst.

    Sew ears onto head. Stuff and sew the head and neck onto the body. Sew legs onto body, making sure the llama can stand. Sew tail onto body.


    rocheting your llama's saddle:

    crochet amigurumi llamas

    With center saddle yarn

    Create a chain with 2 st


    ROUND 1: 6 SC in the second chain from the hook. (6)


    ROUND 2: SC 3 in first st, SC 2 in next, SC 1 in next, repeat (12)


    ROUND 3: SC 1 in first st, SC 2 in next 3 st, SC 1 in next 3 st, SC 2 in next 3 st, SC 1 in last 2 st (18)


    Change yarn colour.

    ROUND 4: SC 1 in first 2 st, SC 2 in next 5 st, SC 1 in next 4 st, SC 2 in next 5 st, SC 1 in last 2 st (28)


    ROUND 5: SC 1 in first 4 st, SC 2 in next 6 st, SC 1 in next 8 st, SC 2 in next 6 st, SC 1 in last 4 st

    End with slst, cut yarn and weave in ends.


    To make the fringe on the sides, loop on pieces of yarn to 8 of the st on the sides, cut to desired length and pull apart ends to fray.

    Use chain st to create a saddle chain and loop onto sides of the saddle to attach.

    And there you have it! Your very own crochet Crafty Llama!


    For more products, check out our Crochet Shop.

    If you follow this pattern and decide to share your results, please tag us on Instagram @craftyllamauk! We love to see all the wonderful creations you make.

    Stay tuned for more free crochet patterns in the future. Have fun, and happy crocheting!

    Continue reading
  • 5 Free Knitted Fruit & Vegetable Patterns

    5 Free Knitted Fruit & Vegetable Patterns

    Since the warmer months are now approaching, many of us knitters/crocheters don’t really want to be making sweaters and hats yet (that’s more of a job for July – in my case at least, since it takes me six months to finish a sweater!). So what shall we occupy our idle hands with? Why not try your hand at knitting some cute fruits and vegetables! They’re perfect for little ones or for simply decorating your own house.


    Without further ado, here is a list of five fun (FREE!) knitting patterns of fruits and vegetables to create your own set. After all, five a day keeps the doctor away! Simply click on the title of each design to view the pattern:


    The first fruity pattern is of the cutest avocado you’ll ever see! The avocado has two halves: one hollow and one with the pit – isn’t that adorable! To make this you’ll only need to know basic knitting stitches, such as knit and purl, decrease and increase. The pattern is also knit flat, so no need to knit in the round!

    Here are the supplies you’ll need:


    This next pattern of a spring onion is too cute not to make! Requiring the same techniques as the previous pattern, this is also beginner-friendly.

    Here are the supplies you’ll need:


    Are you a lover of sweetcorn? If so, this next pattern is for you! Using the basic techniques of the last two patterns, this sweetcorn pattern is easy to make and the perfect addition to a toy box!

    Here are the supplies you’ll need:


    This next pattern is perfect for using up any yarn leftover from the previous patterns. This pea pod pattern is perfect for beginners and once you see how easy and fun they are to make, you’ll want to make more!

    Here are the supplies you’ll need:


    Last, but certainly not least, is this beetroot pattern. Using the same techniques as previous patterns, this adorable little beetroot will add a pop of colour to your vegetable collection!

    Here are the supplies you’ll need:


    For more patterns check out @Amanda Berry on Ravelry! She’s got a variety of different fruit and vegetable patterns to make and they are all so adorable!


    For more supplies, visit our Knitting and Yarn Shops. Be sure to tag us on Instagram @craftyllamauk!


    Have fun, and happy knitting!

    Continue reading